Exchange 2013 – Autodiscover returns FQDN instead of server.FQDN


Autodiscover is a technique, which allows users an effortless configuration of their email client. By this, users can configure the email client with only their email id and password. Users can perform so many operations via this utility. Such as download offline address book, view calendars etc. This service is required for connecting Outlook with Exchange since Outlook 2007 as well as Exchange 2007. Due to some reasons, Exchange atmosphere still has not been applied properly.
Sometimes users get error messages while connecting Outlook with Exchange 2013. Therefore, here are the total solutions for users, to connect Outlook with Exchange once again. All the discussed methods are fully supportable and configured by Microsoft. To apply these methods, users do not need any change in Exchange also; there is no need for new SSL certificate.
Manual Solutions for Exchange 2013 Autodiscover Issue
There are solutions on the bases of two conditions:
- End User-Level Solution
- Administrator-Level Solution
End User-Level Solutions Autodiscover Issue
If you are end-user then, you have to follow this solution methods section.
Method 1: Local XML Redirect Exchange 2013 Server
Step 1: Checking for the default Autodiscover URL
The Exchange 2013 has HTTP is having Proxy Autodiscover and the location of it is following:
Files > Microsoft > Exchange Server > V15 > Logging > HttpProxy > AutoDiscover
In this method, we are going to check that Autodiscover for user email domain is available to alternative URL. For executing this, follow the down statements:
- Log in to OWS from the outside of your organization network
- Now, type the following URL (replace the first part with own OWA domain)
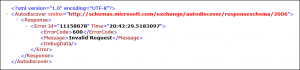
![]()
- This time you will see a website with ErrorCode 600 and an Invalid Request
Step 2- Create a new local XML redirect File
- Open Notepad and create a new file.
- Copy the down written commands and paste them in that.
Now, save the file. As this is an important file then change its extensions from .txt to .eml
Note: Write the RedirectURL of your own company for Autodiscover URL
Step 3- Add autodiscovery reference to registry
- Open, Registry Editor and then add the following value name with value type;
Key
![]()
Value, Name, Type
![]()
![]()
![]()
Note: ‘Value name’ should match the domain part of email id and ‘value’ should show the accurate location of your autodiscovery.xml file, which you created in step 2.
Step 4- Configure Account in Outlook
- Launch Outlook application and add your account to Auto Account Setup option
- In this auto-configuration method, a warning message will prompt and it may need for supplying your account details. You have to do this only once and Outlook will never bother you again for this.

Method 2: Local XML for Solving Autodiscover Issue
If Autodiscover URL is not returning any results, the above method will not work. Then, you will need XML-File, which is containing the entire Exchange settings.
Whenever you are internally connected to Exchange, have a look at the following mentioned hidden folder;
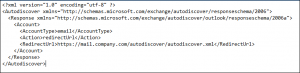
- In this location, you will get a hidden XML file, which is starting with a long string and ending up with –Autodiscover.xml. Check the hidden file location via the following location:
![]()
- Copy this location to C Drive>>Autodiscover folder and give a name autodiscovery.xml
- After copying XML file, follow step 3 and step 4 from Local XML Redirect method.
Administrator-level Solutions for Exchange Autodiscover Issue
If you are getting this problem at administrator-level then, you have to follow this solution method section:
Method 1: XML Redirect on the Root Domain
If you are unable to set the external DNS records of your corporate due to some reasons then, you can place XML Redirect file into the Web server hosting of your root domain.
To perform this operation, follow the Step-2 from Local XML Redirect method. Now, instead of storing autodiscovery.xml file in the local computer place the data file on the web server hosting corporate website. Therefore, it’s published in the following URL address:
![]()
Check the Autodiscover service by Microsoft Remote Connectivity Analyzer. Once it’s done, the also perform the Outlook Connectivity test. If it’s failed then, you need to configure proper external URL in Exchange.
Power-Shall Script Solution for Exchange Autodiscover Issue
Configure Exchange by using Power Shell script to make a fast and simple configuration on users Exchange servers.

Effortless Solution Method for Autodiscover Issue in Exchange 2013
We recommend users Exchange EDB Viewer, which is one of the best solutions for getting over from this error message. This tool is a comprehensive solution to Open and views the Exchange EDB Mailbox Items. This application is scan and views the corrupted exchange EDB file mailbox data. This tool supports the scanning of both Priv.edb as well as Pub.edb mailboxes. It also has Dual scanning mode: Quick and Advanced on the bases of database corruption level. This tool can easily resolve this error message.
Observation
In this blog, we have discussed ‘Autodiscover Issue – Exchange 2013 – Autodiscover returns FQDN instead of the server.FQDN ‘error message. This is containing total solutions form end-user level as well as administrator-level. However, manual solutions are must need technical knowledge also they are time-consuming. Therefore, we recommend alternate and effective solution method Exchange EDB Viewer software. Now, users can opt any of the mentioned methods as per their suitability.