Inbuilt Feature: Mac Backup and Restore with Time Machine
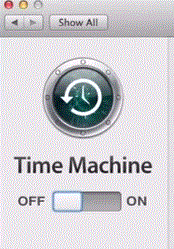
Time Machine is an automated in-built software of Apple’s Mac OS X. It helps in creating backup either to a Time Capsule or any external Hard Drive. It helps to create a backup of your present data as well as the data which was backed up a week, a months or a year ago. This feature is only available with Mac OS X Leopard and Snow Leopard. The ” Time Machine” is entitled so, because it can time-travel and fetch the data from past. Icon used is depicted above.

What is Time Capsule?
Time capsule is a hardware which consists of wi-fi and a hard drive. It comes in size 2TB and 3TB.It can also be used with Time Machine in order to automatically backup data. The below picture shows a Time capsule of 3TB. Setting up Time Capsule can be very costly for users. So let us discuss about backing up data using an external Hard-drive.

Backup and Restore Mac using External Hard-drive with Time Machine
Steps to Backup Mac
1. Firstly, you need an external Hard Drive to backup your data.
2. Connect this Hard Disk to your Mac using USB Cable. Make sure that the disk is connected.
3. An icon appears on your desktop as soon as you connect the drive.
4. You can explore “Time Machine” in search bar. Also, named as “Spotlight” in Mac.

5. Select “Set up time machine” that is displayed while searching.
6. Here you will see Time Machine window on the screen. Turn” ON” Time Machine by sliding the button.

7. Select your external hard drive where you want to create a backup displayed in the options.Select” Use Disk” where the time machine shows the space available on your external drive.
(Note: Make sure that your hard disk have enough space to backup the required data)
8. Select “Show time machine in menu bar” which allows you to display the icon for Time Machine on the screen for quick access.
9. Click on “Options” if you need to exclude any folder while backing up the data.
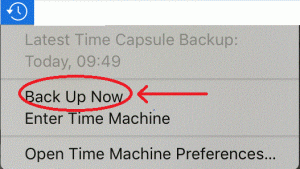
Time Machine automatically starts the backup. Otherwise, Right click the Time machine Icon> Choose Backup Now as shown below:

10. It is provided with a feature of encryption. If you wish to encrypt your backup, click on Encrypt backup
11. Once the backup is done, you can go to the drive and the data is present in Backup Folder.
Steps to Restore Mac
1. Open Time machine
2. Choose the folder you want to backup>Click on the restore button on bottom right corner of the screen. OR
3. Go to OS X Utilities while booting by pressing Command R simultaneously.
(Note: Make sure that the drive from where you want to restore is connected during the booting process. This process is necessary because it will load the drive into Mac Partition)
4. A window pops up> Choose” Restore from Time Machine Backup”
Conclusion
According to my point of view, with the help of Time Machine you can backup your data every day. If you leave your hard disk connected, it gets automatically backed up after every hour. You do not have to worry about losing your data due to corruption or accidental deletion of data. Time machine is a worthwhile application developed for creating backup of entire Mac. The amount of data backup only depends on the size of destination storage where you want to create backup.

