Upload PST to Office 365 Using 4 Different Approaches


Summary: Are you seeking a solution to upload PST to Office 365? In this post, we’ve demonstrated four distinct approaches for securely completing this procedure.
Almost everyone must be familiar with the cloud platform Office 365. Microsoft introduced this interface to give users a collaborative environment so that they can make the most out of it.
That’s why many organizations are migrating to Office 365. Further, when moving to Exchange online, the tech giant allows uploading the content of the pst files to an Office 365 account.
Also, it’s better to upload all your important emails, files, and documents from Outlook to the cloud.
Why? We’ll discuss the reason in the coming section shortly.
However, the main question is how are you going to upload PST to Office 365.
Well, don’t worry, in this article, you will find both manual and automated methods. And, by the end of the blog, you will be sure of the best approach to choose to carry out the task.
So, let’s first start with the reasons for importing pst files to Microsoft 365.
Also Read: Migrate Outlook Emails to Office 365 Mailbox: A Stepwise Guide
Why Upload PST Files to Office 365?
What if I tell you, you can get many benefits after uploading your pst file to O365?
Yes, you read it right!
Here are some of the advantages you get when you upload PST to Office 365.
- Your data will be always available and you can access it from any device since all information is stored in the cloud.
- It helps you address the compliance needs of your organization.
How? Well, it will let you apply Microsoft 365 compliance features to the data from the pst files that you imported.
- You can use data loss prevention policies to prevent crucial data from leaking outside your enterprise.
- In addition, you will get an ample amount of storage space to save your sensitive information.
Now, let’s discuss the how-to approaches for uploading pst files to Office 365.
How Can You Upload PST to Office 365 Effortlessly?
There are 3 different manual ways you can use to import your data. Or, if you want a hassle-free way to bring in your sensitive information to Office 365. Then, you can opt for the expert-recommended automated method.
To name the manual methods, they are;
These are the native solutions offered by Microsoft itself. Since Microsoft is one of the reputed technical firms, its solutions are also technical.
So, to apply the manual methods into practice you need to have highly technical skills.
On the other hand, the automated method uses the tried and tested software Office 365 PST Import Tool that lets even a non-technical user can upload PST to Office 365 easily. For that, you just need to follow a few easy-to-do steps.
Hence, without any delay, let’s get familiar with the automated method first, then will move forward to the manual methods.
Automated Method: Effortlessly Upload PST Files to Office 365 Using Trustworthy Software
The requirement to upload the number of PST files differs from user to user. So, this tool is designed in such a way that it will meet the expectation of every user.
No matter what is the size of a file, whether want to upload a pst file of one user or multiple users, the software is going to fulfill the needs.
Then, what are waiting for? Let’s understand the detailed procedure of the tool.
Detailed Steps to Upload PST to Office 365 in Fews Clicks
Step 1. Run the software and enter the credentials as per your need. Then, hit the ‘Login’ button.

[Caution: If you are an Admin and want to upload multiple accounts simultaneously then don’t forget to click on the ‘Is Office 365 Admin’. Otherwise, just leave it unticked and provide user login details]
Step 2. Choose any one of the options: Add File, Add Folder, or Add CSV to upload the PST files to Office 365.
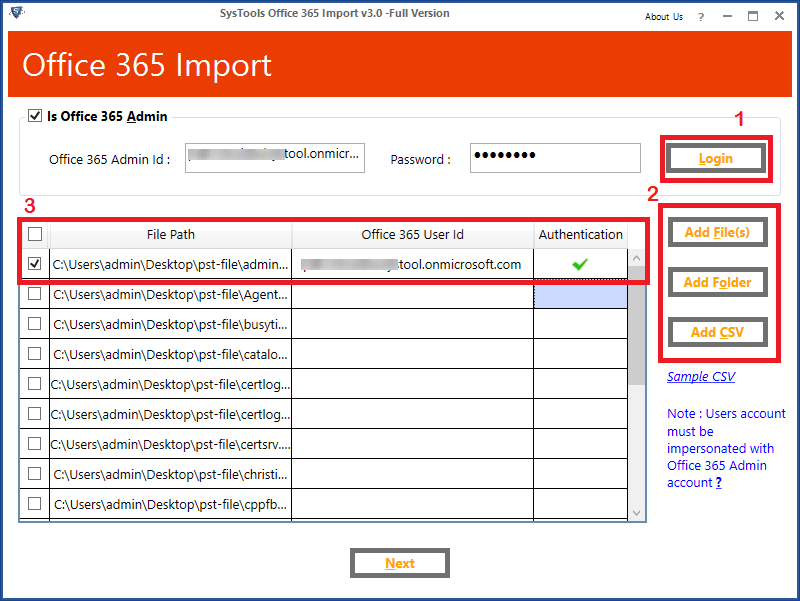
Step 3. Map the PST files with their Office 365 user-id and check the authentication.

Step 4. Select the Category(email, calendar, tasks, etc you want to upload).
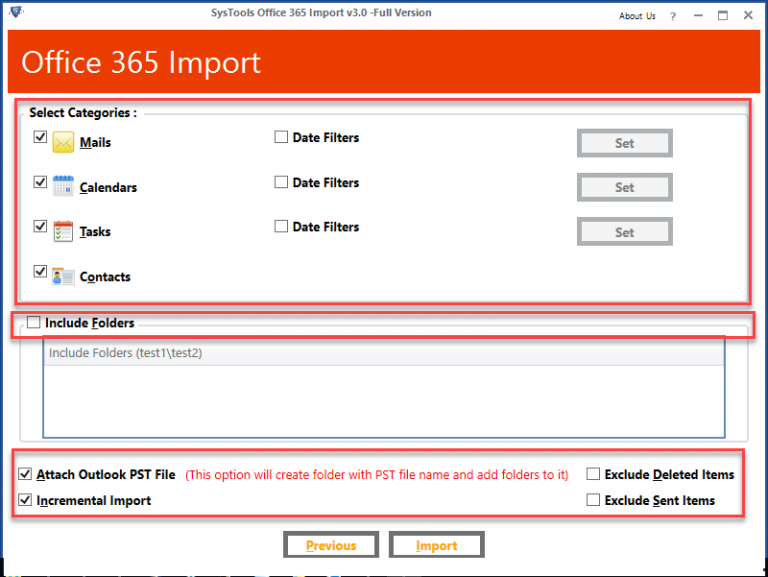
[Note: There is an option to apply date filters for each selected category. Just select the date range and you are good to go]
Step 5. Finally, click on the ‘Import’ button to upload PST to Office 365.

There are some other benefits you can get by using the tool.
Some of the advantages are,
- You can use the incremental import approach. That means you have imported PST files to Office 365 at least once. Then, in the next attempts, you can prevent the migration of already imported data. For that, you just have to click on the ‘Incremental Import’ option.
- By clicking on the ‘Attach Outlook PST File’, you can maintain the folder hierarchy of the source file at the destination. Thus, easy to find and access the files.
- The best thing is there is no need for PowerShell commands to upload PST to Office 365.
Though the above method is the best choice for uploading the PST files. But, still, let’s have a look at the manual methods to know the challenges you may face while using the same.
Manual Method 1 – Upload PST to Office 365 Using Import/Export Wizard
This method will be useful if you have less number of files to upload. But, there is a prerequisite you need to ensure.
That is, you must have configured your Outlook account. If you have not done the same then follow the below steps.
- Open MS Outlook>>File>>Add account
- Provide the Office 365 email account
- Add Password>>Finish
After setting up the account, you can Upload PST to Office 365 by going through the given steps.
- On the top left side of your screen, you will find the File tab, click on it, and select Open & Export>> Import/Export.
- Then, choose the ‘Import from another program or file option>> click Next
After that, select Outlook Data File (.pst)>>click Next
- Click on the Browse button to select the PST file path to import. And, choose the desired radio button under the ‘Options’ section>>Hit Next.
- Tick the Include subfolders checkbox(If you wish to upload the complete file, and select the root file). Then, choose the radio button ‘Import items into the same folder’>> Provide your Office 365 account id.
Finally, click finish.
Manual Method 2 – Drive Shipping Approach to Upload PST File to Office 365
This native method involves saving PST files to a secured hard drive. Then, you need to ship it to one of Microsoft’s physical locations.
After that, the tech giant will authenticate and upload the contents of the hard drive to the cloud.
However, before you upload PST files, you have to be assigned a Mailbox import-export role in Exchange Online.
And, this method has its own set of limitations. Such as,
- Only a limited number of users can use this method since it is accessible in only a few countries.
- You need to pay $2 per GB of data, i.e. if you want to upload 1TB of data then you will have to pay $2000 which is not cost-effective.
- More importantly, you can only ship 10 drives at one go and you can’t upload more than 300 folders using this method.
Manual Method 3 – Upload PST to Office 365 Using the Network Upload Approach
This method is no doubt free but it requires high-tech knowledge to pull off the task.
Since it uses the PowerShell Scripting language, this method is of no use to non-technical users.
Moreover, there is a high chance of data loss if you accidentally entered a wrong in-line command. However, you can use this method at your own risk.
- Install the AzCopy Tool.
- Upload All PST Files to Office 365.
- Create PST Upload Mapping File.
- Then, Create a PST Import Job.
- Filter & Start PST Upload Job.
[Note: There is a size limitation of 20 GB to upload PST files]
Limitations of Using Network Upload Mehtods
- Using the Network Upload, you can not upload PST with more than 20 GB of size.
- You have have global admin or Office 365 admin access or previllage for same.
- It is a complex yet time-consuming task as it requires the familiarity with Exchange admin center.
- You should be technically sound in order to work with this method.
- While dealing with PST files, you might face file corruption issues.
Final Words
Now, you must be sure that manual methods are not suitable options. Each of them has a different set of hurdles like complex configuration, pay-to-get policy, requires strong programming skills, etc.
However, you have the expert-recommended automated method that seems to be the best option to upload PST to Office 365. Hence, make your move fast!