Apple Mail to Gmail Migration – Way to Move Mac Mail to Gmail
Gmail is a web-based email service which has various facilities not just for communication but a lot more. This is why the Apple Mail to Gmail migration is in lime-light these days.
We all know that most of the Mac OS users create an account on Apple Mail and generally use it for communication.
Users of Apple mail do not get all the services that Gmail might provide, i.e. to be able to read your emails from any device at any time.
Moreover, Gmail offers security to the data with its 2-step verification service & allows using Google Photos, G Drive, & Google Docs.
Also, there might be other reasons like switching to Windows or moving to an organization using Gmail. Thus, users majorly export Apple mail to Gmail for better functioning & universal access.
We have received the following queries on our forum site:
Query 1 – I use Apple mail for all my communication with my clients which has been good until now. As I got a promotion, I began traveling a lot & I can’t carry my Apple computer obviously. I wish to switch to Gmail, can someone help me with that?
Query 2 – I’m switching to another company & I need to move all my data from Apple mail. The destination would be Gmail. If there are any suggestions on how to do that, please help.
Apple Mail to Gmail Migration Is Possible in Three Ways
First method is the best technique which all the experts of migration have also recommended. It doesn’t create any complications, makes the process easier, and takes action in bulk.
The second solution is by using Gmail’s built-in Import facility. With this method, you can import the emails from your Apple mail account by entering a few details.
For the third method, we will apply the configuration facility. Here, users have to configure their Gmail account with their Apple mail account.
Let’s start with the first technique.
Expert’s Way to Export Apple Mail to Gmail in a Painless Manner
This method is the IMAP Mail Migration Software Mac which is highly capable of exporting emails from one client to another.
You can also migrate Apple Mail to Office 365 with the tool’s user-friendly interface allowing a simpler way to understand the process.
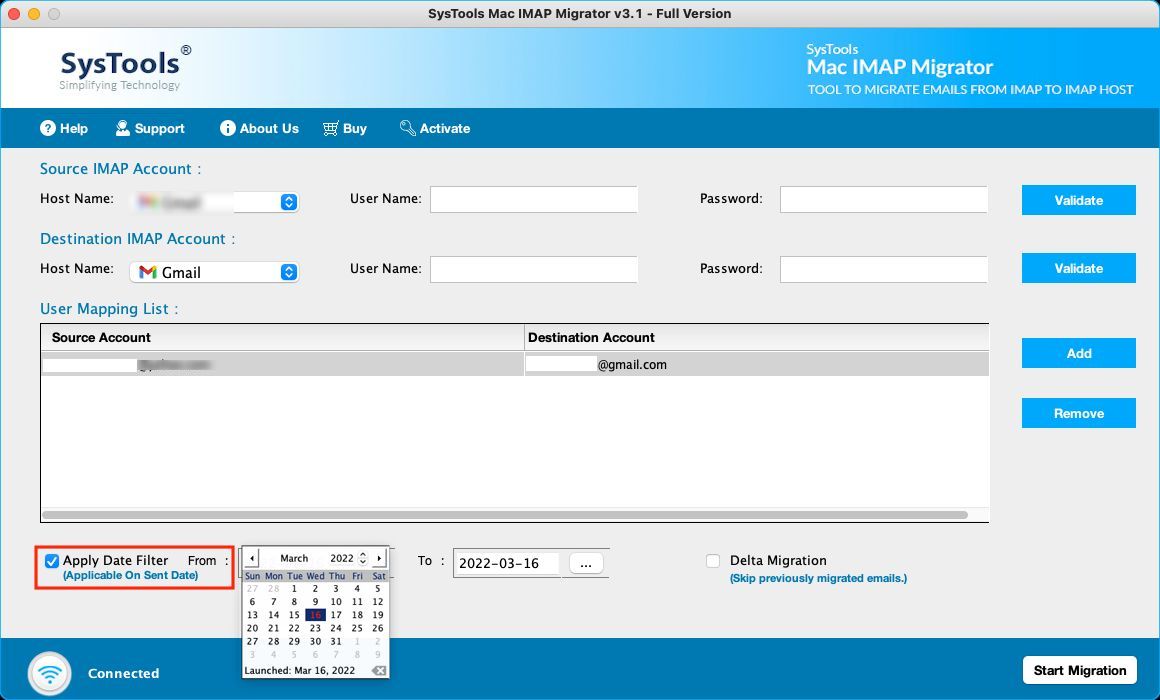
The software is embedded with a Date-filter wherein users can set the dates for a specific time-period. Doing so triggers the software to pick only those files that fall under the chosen duration.
There is no need to worry about the folder structure or data integrity as the tool ensures they remain the same. After Apple mail to Gmail migration, you shall find all your data safe & sound with a maintained folder hierarchy.
More: Read about the process to export/migrate Apple mail to Outlook as explained in this article.
Step-Guide for Migrating Emails in Bulk Or Selectively
1. Download and run the tool on any Mac OS version. Enter the Source platform as Apple Mail and provide the account credentials. Press the Validate button.

2. Choose the Destination platform as Gmail and enter the Gmail account login details. Validate account for verification.
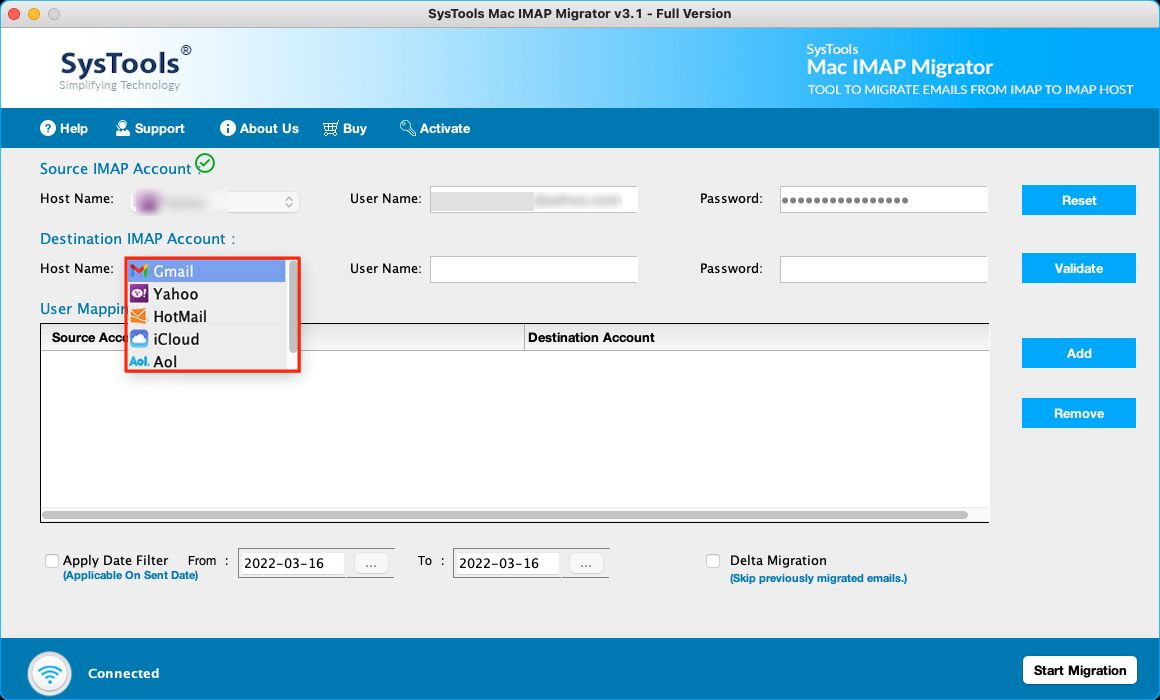
3. In the User Mapping List section, the mapping to export Apple mail to Gmail. You can add more user IDs for mapping if needed and click on Add button.
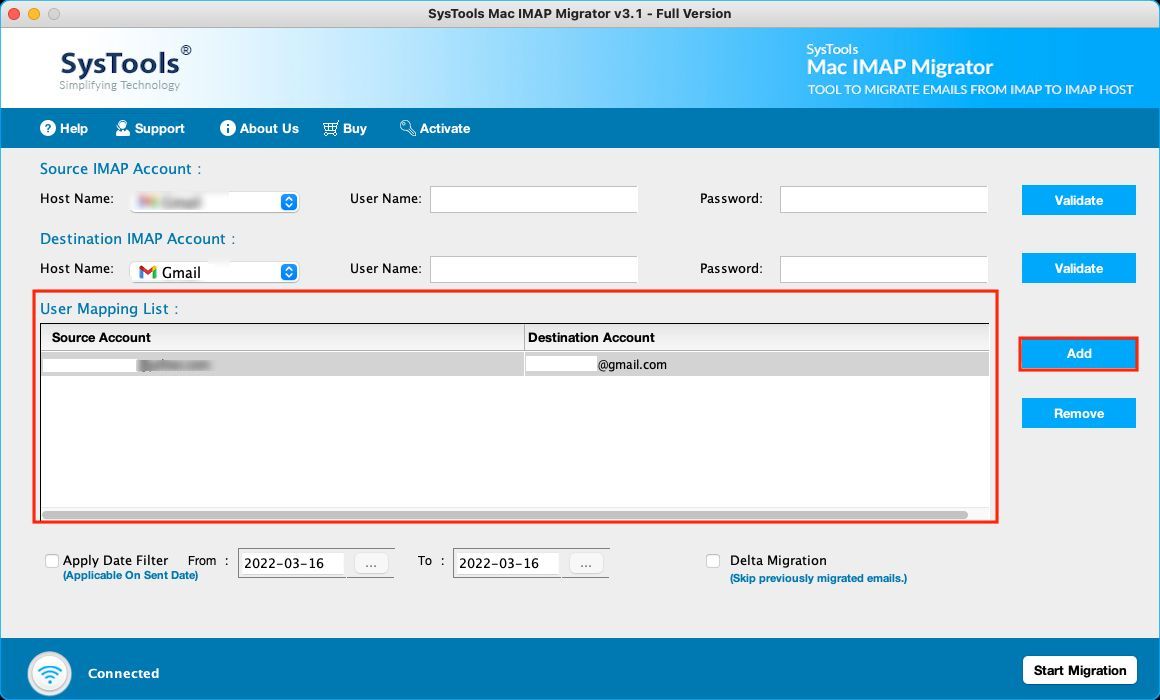
4. Then, use the Apply Date-filter option for choosing a certain time-duration to migrate selected files only.
5. Finally, click on the Start Migration button to complete this operation.
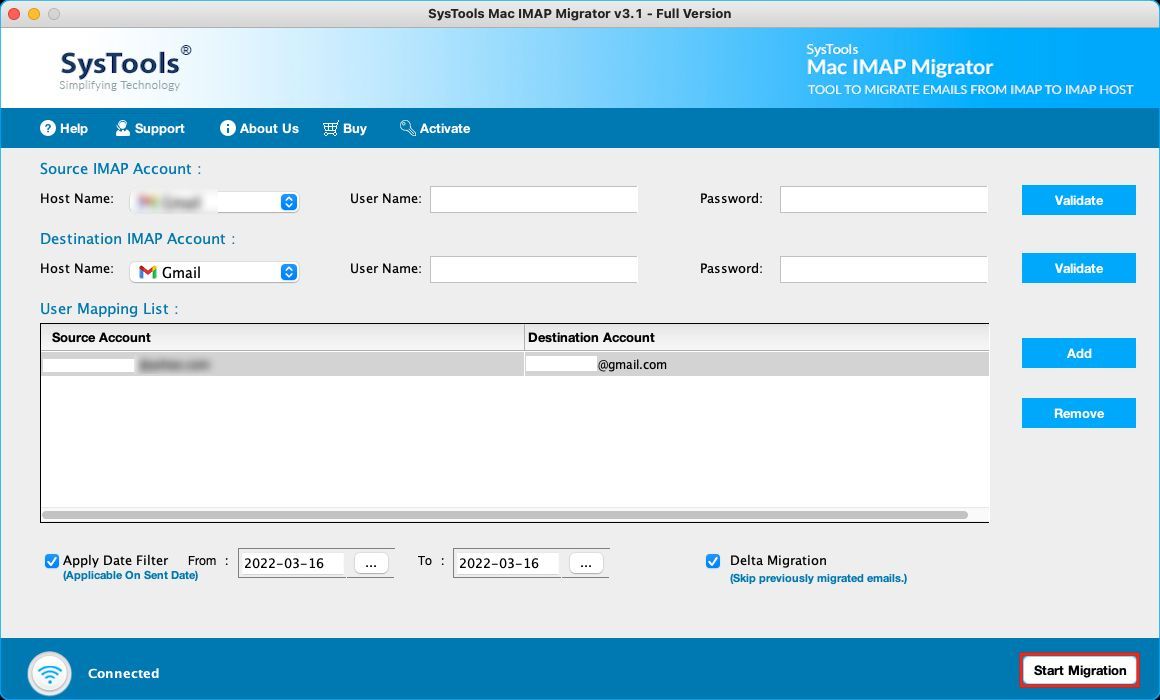
After the procedure is completed, the files will reflect in the Gmail account.
During the migration or after it, if you receive more emails, you can use the Delta Migration feature. It will pick only the recent files and migrate them to Gmail and eliminate wastage of effort of the end user.
Manual Method 1 – Apple Mail to Gmail Migration Via Gmail’s Built-In Feature
Follow these steps:
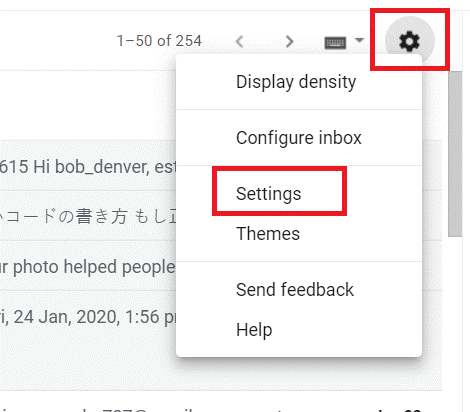
1. Begin the process by logging in to your Gmail account. Click on the Settings Gear and choose the See All Settings option.
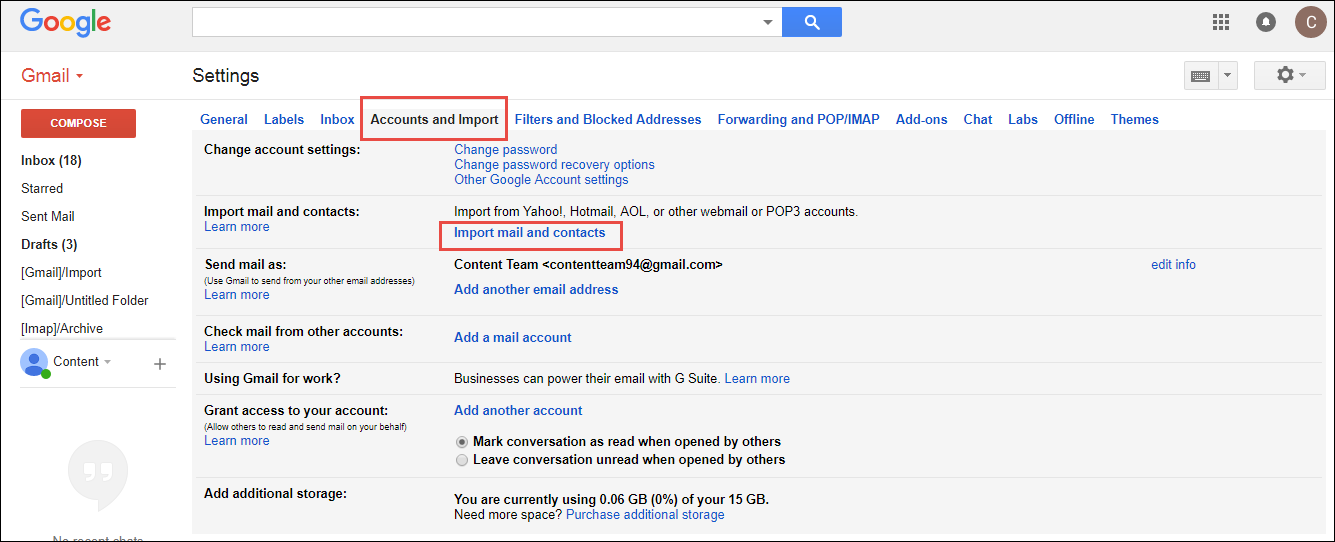
2. From the window that opens, select the Accounts and Import tab. Choose the Import Mail and Contacts option from there.
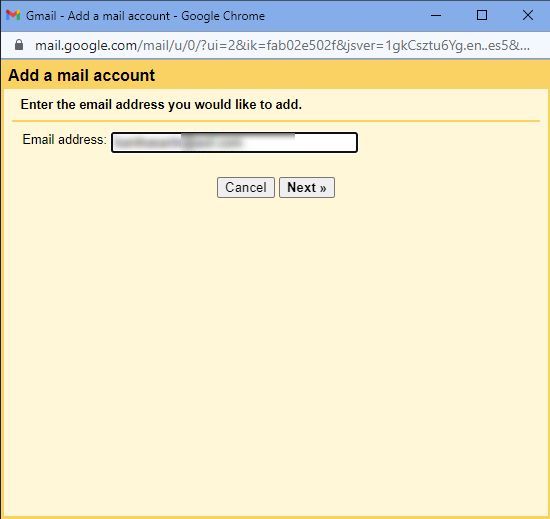
3. In the dialog box, enter the Apple mail username and click on the Continue button.
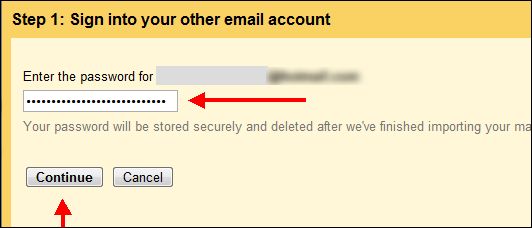
4. Provide the Password for your account and hit Continue.
5. Click on the Import Mail option & press Start Import.
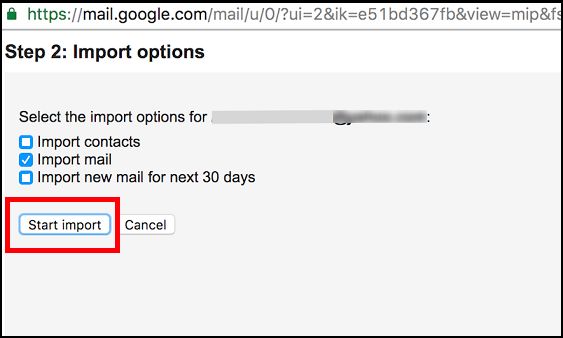
6. Lastly, hit the OK button.
Manual Method 2 – Another Way to Export Apple Mail to Gmail
Here is another option that you can consider wherein you have to configure your Gmail account first. Then, you can drag the files and drop them in your account.
Go through the following steps:
- Set up your Gmail account in Apple mail which you want to migrate the data in.
- After that, click on the Mail option in the Apple Mail and choose the Preferences option.
- Click on the Accounts button and choose the Add option (+) from the Menu bar. Then, sign in to your Gmail account.
- For completing Apple mail to Gmail migration, open the Inbox from the Apple mail and choose the email you want to transfer.
- Then, drag these files and drop them in the Gmail account.
The files will be transferred to your account after doing so and you can access them in the Gmail account easily.
However, there are a few drawbacks that are integrated with the manual methods.
Let’s take a quick look at these limitations.
Drawbacks of Performing the Process to Export Apple Mail to Gmail Manually
- If you perform the manual process, it takes a lot of time to complete it when there are a lot of emails to migrate.
- In case you miss even one configuration step, it might lead to corruption and loss of data.
- Sometimes, users might face challenges wherein they keep finding errors during the entire procedure but do not get to the end.
- The process to transfer emails from a certain time-period is difficult as there are no filters available to do so.
- Non-techies might not be able to migrate the emails successfully.
To Summarize
In this article about Apple mail to Gmail migration, you will find how the manual methods work and what the limitations are for the same. During the manual migration, users find various difficulties and don’t always get accurate results.
On the other hand, the software makes it a quick and simple process with no troubles faced. Users can export all their files in a swift motion and find no errors during the transfer.


