How to Migrate Exchange 2013 to Office 365? Multiple Ways Explained


Microsoft Office 365 is one of the most loved cloud-based productivity suites to date. This productivity suite is loaded with a lot of features and applications such as Outlook, SharePoint, Teams, Lync, etc. Moreover, it helps organizations in cost saving to a certain extent compared to Exchange 2013, due to which many organizations are moving their email services to Microsoft 365. Thus, after looking at the demand of the users, we are going to discuss “how to migrate Exchange 2013 to Office 365 in a step-by-step way?”
However, before directly going into the export process, let us first discuss the reasons, why many organizations/enterprises choose Office 365 over On-Premise Exchange Server:
- Server maintenance & upgrades are not required
- No lag while rolling out features
- Cost-efficient as it reduces energy consumption and hardware upgrade
- Increased efficiency of IT services

5 Quick Steps to Migrate Exchange 2013 to Office 365
- Step 1. Download, install, and run applications on a PC.
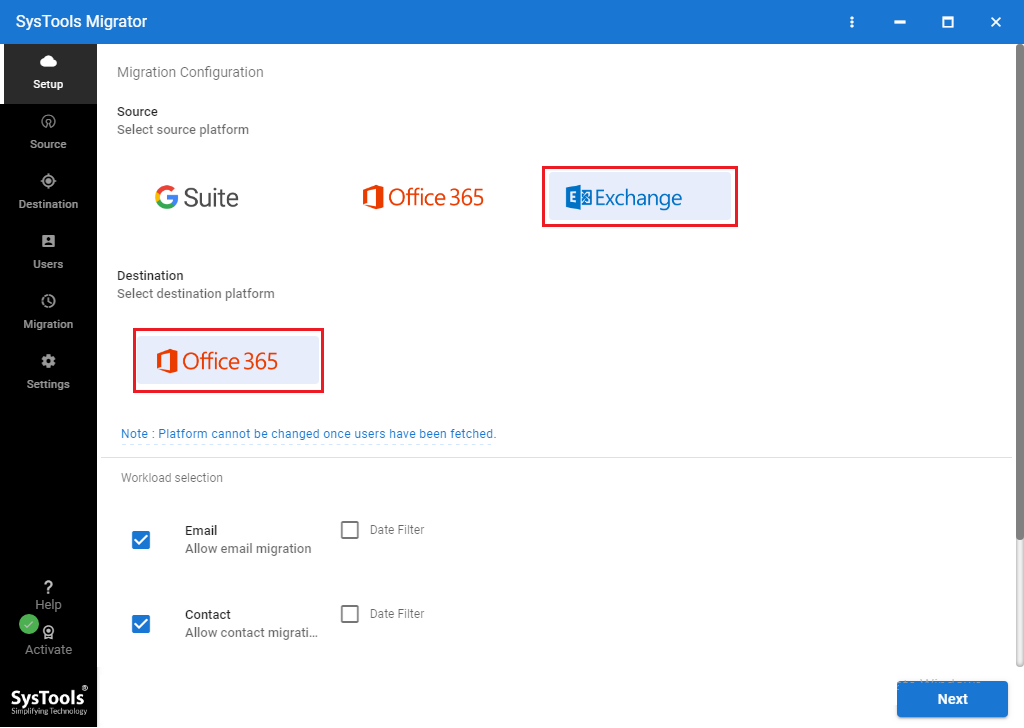
- Step 2. Choose Exchange and Office 365 as platforms.
- Step 3. Select the mailbox workload and set the date filter.
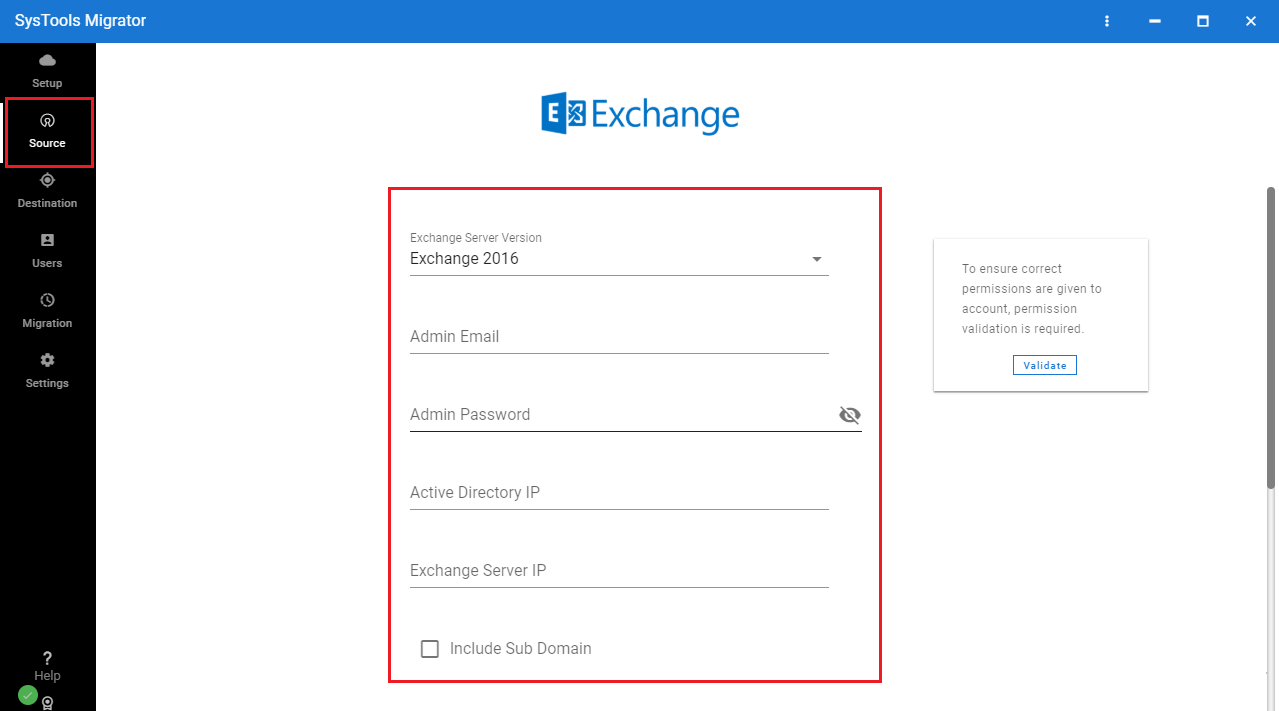
- Step 4. Login and validate with source and destination details.
- Step 5. Create mapping, select users, and click on the start button.
Different Methods to Migrate from Exchange Server 2013 to Office 365 Mailboxes
There are multiple approaches using which the users can perform the transfer process. Every method has its own advantages and disadvantages. Users can select any of the following methods depending on their requirements. Please go through the following section and find the most suitable approach for you.
Manual Methods to Migrate Exchange 2013 to Microsoft Office 365
Exchange Cutover Migration –
This method carries out the migration of all mailboxes in one go. As all the On-Premise mailboxes are transferred simultaneously, it makes it difficult for the users to process a large number of mailboxes. This approach supports up to 2000 mailboxes but is best suited for 150 or fewer mailboxes and can be used for Exchange 2016, 2013, 2010, and 2007.
Exchange Staged Migration –
This approach is useful when the organization wants to transfer many Exchange mailboxes. But it has a limitation associated with it i.e. it only supports Exchange 2003 and 2007. Therefore, if an organization is using any of these versions, then it can choose a staged migration.
Minimal Hybrid Exchange Migration –
The minimal hybrid migration process is best suited if there are many Exchange mailboxes to be migrated. This method helps an organization maintain online and On-Premise mailboxes and progressively migrate data into Microsoft Office 365 cloud. Although this process is smooth, it is complex and time-consuming as it is carried out in small batches.
If a user skips a step during the migration, the process remains incomplete. You can use this approach to migrate Exchange 2013 to Office 365 as well as Exchange 2010 mailboxes.
- Step 1. Confirm Domain Ownership.
- Step 2. Begin Express Migration with a Minimal Hybrid Setup.
- Step 3. Generate Office 365 User Profiles through Directory Synchronization.
- Step 4. Assign Microsoft 365 Licenses to Your Users.
- Step 5. Initiate User Mailbox Data Migration.
- Step 6. Modify DNS Records for Mail Flow.
IMAP-Based Migration –
This is a slow and long process. In the IMAP email migration process, you first have to create user accounts on Office 365 cloud and then start migrating email messages. This takes a lot of time and effort and only exports emails to the destination account.
Step By Step Procedure to Migrate Exchange 2013 to Office 365 Using IMAP
1. Prepare for IMAP Migration:
- Add your on-premises Exchange organization as an accepted domain.
- Create Office 365 user accounts to ensure each user has a mailbox.
- Obtain the fully qualified domain name (FQDN).
- Configure the necessary firewall settings.
- Grant administrator permissions.
- Sign in and import the cmdlets for Exchange Online PowerShell.
- Generate a Comma Separated Value (CSV) file for IMAP migration, containing attributes such as Email Address, User Name, and Password required for the migration.
- Establish an IMAP migration endpoint. Office 365 relies on this endpoint for connecting to and communicating with the source email system. It also determines the number of mailboxes to migrate concurrently and the number of mailboxes to synchronize simultaneously.
2. Create an IMAP Migration Endpoint:
To create a migration endpoint for migrating from Exchange 2010 to Office 365, execute the following command:
New-MigrationEndpoint -IMAP -Name IMAPEndpoint -RemoteServer imap.contoso.com -Port 993 -Security SSL
To confirm its creation, run this command:
Get-MigrationEndpoint IMAPEndpoint | Format-List EndpointType,RemoteServer,Port,Security,Max*
3. Generate an IMAP Migration Batch:
- Prepare a CSV file that includes a row for each user whose mailbox you intend to migrate.
- On the “Select the mailboxes” screen, locate the previously prepared CSV file and proceed.
- On the IMAP Configuration screen, specify the connection settings for the source server to facilitate a seamless migration.
- Provide a name for the migration batch and proceed.
- Decide whether to manually or automatically commence the migration.
4. Route Your Mail to Office 365:
Ensure that the MX record, which previously pointed to the source email system, is now directed to Office 365. This guarantees the successful delivery of emails to the destination.
5. Remove the IMAP Migration Batch:
After confirming that everything is functioning correctly and notifying users about their emails residing in Office 365, you can delete the cutover migration batch using the following PowerShell command.
Shortcomings of Manual Methods In Migrating Exchange 2010 to Office 365
- In order to use hands-on manual techniques, you must have the technical knowledge and working experience with Exchange and Office 365 environments.
- Manual procedures are time-consuming and can be complex for users who are new to either Microsoft Exchange or Office 365.
- Moreover, these methods do not guarantee that users will get 100% data after the conversion process.
- Using the Exchange Staged migration method, you can only migrate Exchange Server 2007 and 2003.
- With IMAP-based migration, you can only migrate emails to the destination, in order to migrate other mailbox items, you have to manually save each data to the destination.
Manual methods do not allow you to migrate selective data from Exchange 2013 to Office 365. You have to migrate the complete data to the target and then you have to filter it. It could lead to data duplicacy and accidental data deletion.
Thus, users who don’t want to lose their crucial data while migrating Exchange 2013 On-Premise into Office 365 cloud are recommended to use the professional application. It helps users to carry out the complete process in a hassle-free way without any data loss.
Also Read: Migrate Exchange Server 2010 to 2013 Using PowerShell Commands
Quick & Efficient Way to Migrate Exchange 2013 Mailbox to Office 365 Using Software Solution
Although, there are several methods available for the users, when it comes to choosing the trusted and reliable solution, it is suggested to use the Most Trusted & Reliable Exchange Migration tool. This software works amazingly well and does not impose any limitations on mailbox size or the number of mailboxes.
The unique set of features makes sure that the users get their source data migrated to the destination account without any hassle. Additionally, the tool makes sure that all the emails, calendars, and contacts are exported without losing any data. There are plenty of features available in the tool and we have mentioned some of the top features below:
- Allows to Migrate Exchange 2013 to Office 365
- No Limitation on Exchange Mailbox Size
- Maintains Original Folder Structure and Hierarchy
- Option to Prioritize User Accounts while Migrating Exchange 2013 to O365
- Provide Pause & Resume Button for Migration
Steps to Migrate Exchange 2013 to Office 365 Mailbox
Step 1. Download, install & launch the Tool on your computer. Then run it as Administrator.

Step 2. Select Exchange & Office 365 as Source & Destination Account
Step 3. Enter Admin Credentials of both Exchange and Office 365
Step 4. Map Source & Destination Users & Validate the required permissions.
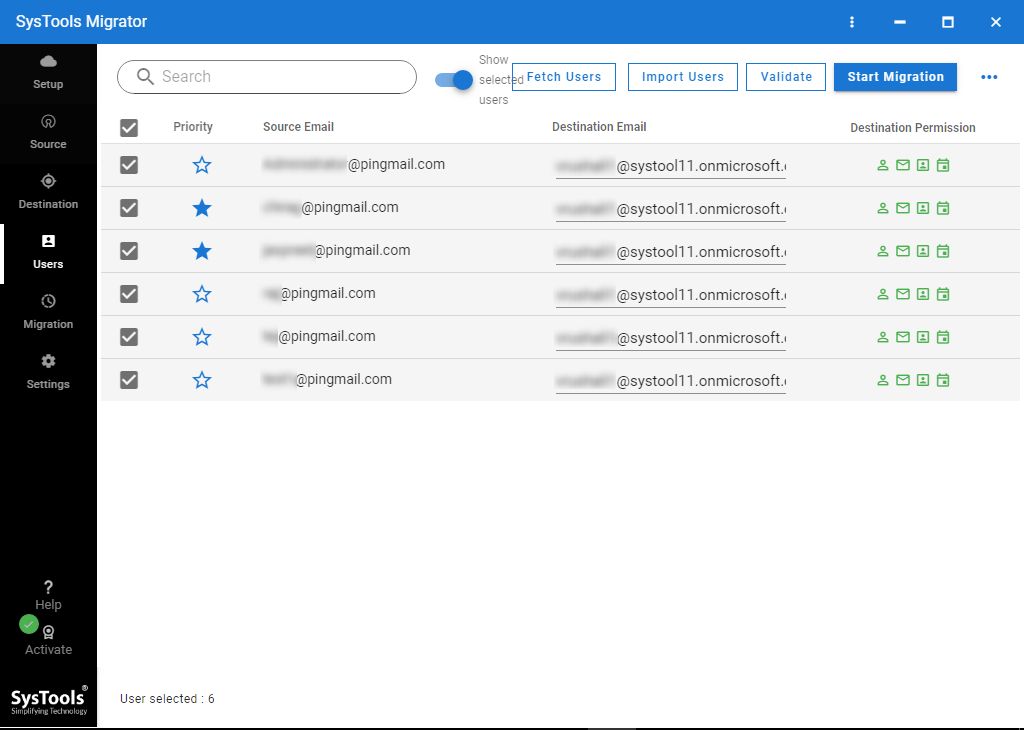
Step 5. After successful validation click on the Start Migration button.
Conclusion
Enterprise asset management is complex and time-consuming. Both under and over-maintenance create complexity, for the IT staff to the end-users. Failure to maintain leads to a loss of productivity, which creates avoidable security gaps and usually leads to higher costs.
Excessive maintenance leads to avoidable downtime and higher costs. It’s always better to switch your paradigm to a more useful, less distracting, and cost-effective Microsoft Office 365 and to migrate Exchange 2013 to Office 365.
People Also Ask
A. There are 5 simple steps to perform the migration:
- Step 1. Install above-mentioned Tool on PC.
- Step 2. Opt Exchange & Office 365 as Platforms.
- Step 3. Provide Exchange Credentials & Validate.
- Step 4. Enter Office 365 Admin and Application ID.
- Step 5. Map Mailboxes, Validate & Start Migration.
A. Migrating all mailboxes from Exchange to Microsoft 365 can vary between a few weeks to a few months. It entirely depends on the number and size of the mailboxes. As per past experiences, you can migrate around 1000 mailboxes within a month or so.
A. The best option is to go for the above-mentioned utility if you have a large number of mailboxes to export. The software has successfully migrated hundreds and thousands of mailboxes over the past year.