How to Migrate Exchange Server 2010 to 2013 with PowerShell Commands


When it comes to migrating the current database of the Microsoft Exchange Server 2010 to Exchange Server 2013, then you need to upgrade to a higher version. In this write-up, we will describe the complete procedure to migrate Exchange Server 2010 to 2013.
In Microsoft Exchange 2010, the system mailbox is said an arbitration mailbox. This arbitrary mailbox saves the complete organizational data such as eDiscovery metadata, audit logs, dial plans, unified messaging data, etc. The mailbox of the system is mentioned as SystemMailbox{e0dc1c29-89c3-4934-b678-e6c29d823ed9} along with displayed name Microsoft Exchange.
Important: The mailbox should upgrade Exchange Server 2010 to Exchange Server 2013 only at a time when MS Exchange version 2013 has been installed as well as verified.
Following problems can be faced since both Exchange 2010 and 2013 editions can coexist in an organization:
- MS Exchange 2013 tasks will not be stored in the audit logs of the administrator. When cmdlet Search-AdminAuditLog is running or the administrator audit logs are transferred to EAC, an error is faced.
- eDiscovery searches cannot be executed by utilizing Shell or EAC. The searches can be made and queued but cannot begin. An error uttering cmdlet Start-Mailbox Search failed is made when the searching is completed.
Pre-Requisites For Microsoft Exchange Server 2010 to 2013 Migration
There are some pre-requisites, which are important to be understood by a user before beginning the process to migrate Exchange Server 2010 to 2013:
- The time invested during the mailbox migration depends on the size of the arbitration or the system mailbox.
- The users need to have the Recipient’s Permissions before the migration procedure is performed.
- Get the identity and version of the Exchange server and the mailbox databases, which contain the system mailboxes. For executing this run the mentioned command:

The value edition 14.x means Microsoft Exchange 2010 and the value 15.x means MS Exchange 2013.
How to Migrate Exchange Server 2010 to 2013 Step by Step Using EAC
By using the below-mentioned steps, users can move the system mailbox to upgrade Exchange Server 2010 to Exchange Server 2013 by utilizing MS Exchange Administration Center(EAC):
- In EAC, choose an option Recipients >> select Migration.
- Select New + >> choose option of Move to a different database.
- In the page of New local mailbox move >> Choose the users that you want to move option.
- Click on option Add +.
- On page Select Mailbox add mailbox with mentioned properties:
Display Name: MS Exchange
Alias Mailbox Email Address: SystemMailbox{e0dc1c29-89c3-4934-b678-e6c29d823ed9} - After that choose OK button >> Next.
- On the page of Move Configuration, enter the name of batch migration.
- To Target database box select, Browse option.
- On the page Select Mailbox Database, enter the mailbox name for the system mailbox to be moved.
- Choose OK >> click Next option.
- On the page of Start the batch, choose an option for automatically beginning the request of migration.
- Select New.
Microsoft Exchange Server 2010 to 2013 Migration by PowerShell Commands
The process to move the system mailbox from MS Exchange 2010 to Exchange 2013 is a two-step procedure, when completed with PowerShell. The first stage is to get the name and edition of MS Exchange mailboxes. This has been already completed in the section of Pre-requisites in the previous step. Once the name, as well as edition, is known, the next stage is to implement the following command in Microsoft Exchange to upgrade Exchange Server 2010 to 2013:
![]()
Use Automated Solution For Microsoft Exchange Server 2010 to 2013 Migration
You can perform the PowerShell method to migrate Exchange Server 2010 to 2013 and move your database into a different version. But there are some limitations of using the above method. For a non-technical person, it is difficult to understand and perform the above-mentioned commands. In that case, you can go for the expert solution i.e. Exchange Migrator to move your mailbox without losing a single bit of data.
This advanced software support various version of the Exchange Server such as 2019, 2016, 2013, 2010, 2007, 2003. It supports private and public Exchange Database File and allow users to export the online/offline Exchange database mailboxes to the Live Exchange Server mailboxes in a simplified manner.
Users can easily extract Exchange EDB to PST, EML, HTML, PDF, MBOX, MSG file formats. The professional utility provides Quick and Advance scan mode option that easily removes corruption from the Exchange database file without any loss of data. For minimal corruption select Quick scan and if your Exchange database file is severely corrupted/ damaged choose the Advance scan mode. You can easily use these options for the Exchange 2016 mailbox recovery along with various versions.
Along with the EDB file, the software also supports Streaming Media File and users can also the above option to recover corrupt Exchange STM files and export them to Exchange Server mailboxes, Office 365, and multiple file formats. After conversion, the tool automatically creates the export report which stores the success and failure count of exported Exchange data.
You Might Also be Interested in DETAILED GUIDE TO MIGRATE EXCHANGE 2007 TO 2013
Quick Steps to Perform Migration
Step 1: Free Download Exchange 2010 to 2013 Migrator
Step 2: Add Offline Exchange DB File That You Want to Move
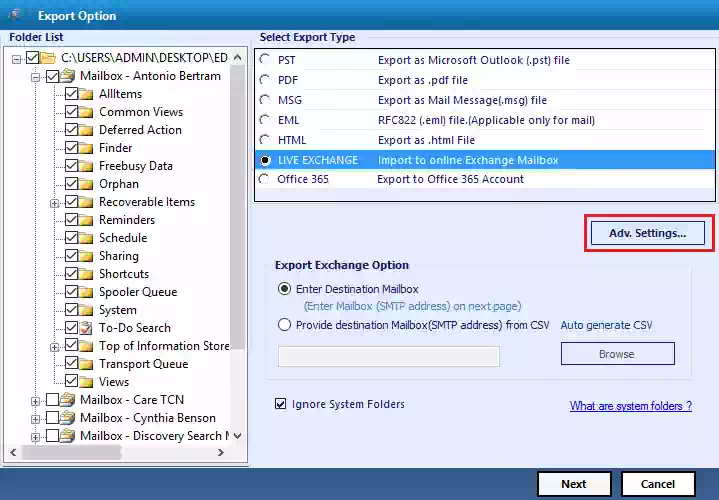
Step 3: Select Live Exchange & Enter Exchange Credentials
Step 4: Enter Exchange Mailbox Name, Validate and Hit Export button.
Conclusion
With the help of the above-discussed process, now users know how to migrate Exchange Server 2010 to 2013 step by step. It is true that the above process is not easy for a non-technical person. The process requires technical skills to execute these steps. But for simple migration, you can go for the automated solution to upgrade Exchange Server 2010 to Exchange Server 2013 as discussed.