How to Set Password in PDF File – PDF Set Password
Protecting sensitive documents is the best way to be sure that your file is safe from being viewed or edited by unwanted parties. This is why learning to set password in PDF file is crucial for users. The protection is especially needed when sending the file over the internet. The Portable Document Format (PDF) is the best file format for reading E-Paper documents. This format is the closest thing the internet has to a paper document.
If you get nervous about sharing confidential information, then it’s time that you encrypt or password-protect your PDF file and prevent access from the man with masks. This article will describe the various methodologies of this topic and make that file inaccessible to unauthorized people.
Protecting a PDF file in Microsoft Windows might not look as easy as it sounds. But with some premium programs like Adobe Acrobat or Microsoft Office, you can achieve the goal of throwing a ball in the air, yes, simple and easy. So let’s begin with the various methods of how to set a password in a PDF file.
Possible Ways to Create a Password Protected PDF
How to Set Password in PDF File Using Microsoft Office
Microsoft Word steps described below will also work for , Excel, MS PowerPoint, and Access. MS Office lets you encrypt the PDF file so that no one without the appropriate permission is able to access the file. Please follow the steps below in order to set a password in PDF file:
Step 1. Open the document first and then click on File and then select Export. Then click on the Create PDF/XPD Document to export the document as a PDF file.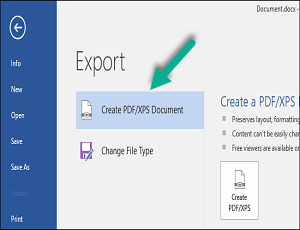
Step 2. A new Save Dialogue window will open, click on the Options button and enable the Encrypt the Document With a Password option and click OK.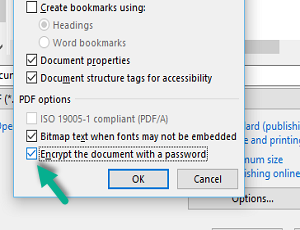
Step 3. Next, you have to enter the password you want to secure with. After entering the password, click on the Publish button after giving a name for the PDF file and Office will save the PDF file with the password.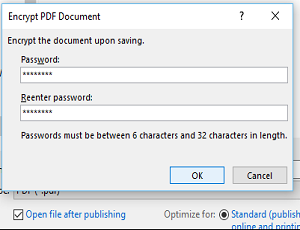
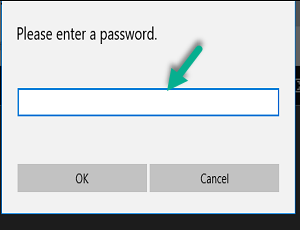
Step 4. Next time when you want to open the PDF file, you will be prompted for a password.
Points Worth Remembering:
-
-
-
Documents which are fully encrypted are completely secure. Documents which are encrypted with “Restrict Editing” are not fully secure.
-
Modern document formats like .docx are more secure than the old ones. Older .doc, which is compatible with Office 2003 is not a secure version to encrypt.
-
-
The security of Microsoft Office is pretty tight, especially from Office 2007. Office 2007 supports 128-bit key encryption by switching to Advanced Encryption Standard(AES). This security system is widely considered.
Also Read:- Top 2 Best Methods to Merge PDF Files Without Watermark
Use Expert-Suggested Automated Tool to Password Protect a PDF
Use this most approached PDF Password Adder Tool to set password in PDF file to secure PDFs with the latest and rigid types of security. This tool has salient features and comes at lower prices than Adobe Acrobat and gives more features from it.
-
-
- Allows To Set Password On Printing, Copying, Editing, And Extracting Pages
- Users Can Restrict Permissions For Filling And Commenting On PDF
- Use Upgraded Encryption Options Including Aes256 Bit
- Batch Processing(Multiple Files) Option To Select Files
- Extract File in CSV Format Option
-
Step #1. Open the software and select Add File(s) or Add Folder option to add the PDF Files.
Step #2. Select the path or change the default location to save the password-protected PDF.
Step #3. Navigate to the Settings tab in the panel and choose Apply Document Restriction and other relevant settings as per your needs.
Step #4. Once settings have been implied, Enter the Password to secure the PDF and Set the Password in the PDF File.
Step #5. Once you applied all the settings, Click on the Lock button to secure the PDF file.
Why Set Password in PDF File Using Adobe Acrobat
You have to take a 30-day free trial of an Adobe Acrobat account in order to protect PDF files from unauthorized access. Please browse over to this Adobe Acrobat(https://acrobat.adobe.com/us/en/free-trial-download.html) link and click on the blue Get Started button.
Step 1. Now you will get a form, please enter your credentials and sign up. Upon completing your file will start downloading automatically. Download and install the file.
Step 2. Launch the application and click File then Open to open your desired PDF file that you want to protect with a password.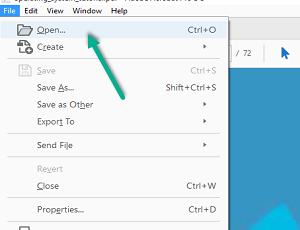
Step 3. Now you have your document opened. Click on File again and then click on Properties.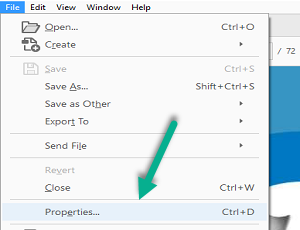
Step 4. A new dialogue box will open, click on the Security tab. Click on the drop-down menu beside Security Method and select Password Security.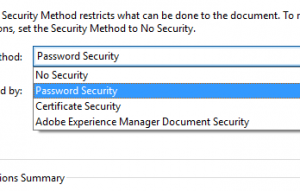
Step 5. A new window will open. Check on Require a Password to Open This Document and set password in PDF file in the Document Open Password box.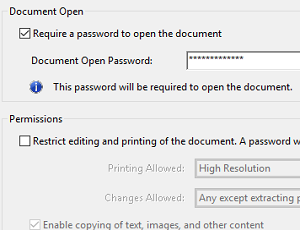
Remember to save the document, otherwise, the settings will not be applied to the document.
Where to Restrict Edit and Printing Using Adobe Acrobat
Setting a password to the whole document and encrypting it from unwanted parties, surely works but the best-advanced feature of Adobe Acrobat is that you can set individual permissions such as printing or editing, without protecting the whole document. Here are the steps to so so:
Step 1. Follow Step 2 to Step 4 from the above methods and bring the Security tab.
Step 2. Next click on Change Settings if your PDF is already password protected, or follow Step 4. Click on Restrict Editing and Printing… check box. You will see something like this: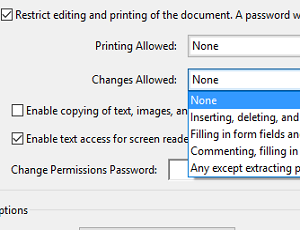
Step 3. Change the permissions accordingly and set a permission password. Click on ok and then Save.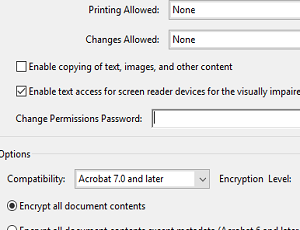
How to Password Protect a PDF File Using the Tools Menu
You can also protect and set the password by using the Tools menu in Adobe Acrobat. Permissions, along with the password can also be set easily by following this procedure.
Please follow the steps below to know how to set a password in PDF File using the Tools menu.
Step 1. Launch the application and Click on Tools then please click on the Protect sub-menu icon and you will see something like this: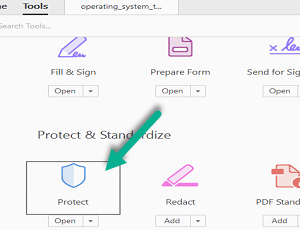
Step 2. Now find the lock icon in the Protect toolbar and click on the little pull-down arrow key and select Encrypt With Password.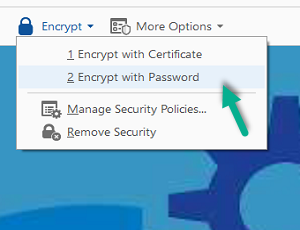
Step 3. A new Password Security window will open and here you can set a password or change permissions accordingly.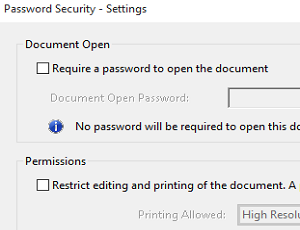
Step 4. Finally, click on OK and Save the settings to take effect.
When Creating a Security Envelope to Secure PDF
So far you have learned the methods of how to set password in PDF file for individual PDF files one at a time. And the methods are pretty easy, right? But what if you have lots of files to protect, then following the above methods and setting a password to every individual file becomes needlessly time-consuming.
This is where Creating a Security Envelope comes to mind. This is an amazing feature provided by Adobe Acrobat especially when you want to protect a lot of files with the same password. The envelope will be a PDF file and the individual file will be attached to it. More importantly, you do not have to attach only PDF files, you can attach Word files, Excel Spreadsheets, and other kinds of files. Cool, isn’t it?
Here are the step-by-step techniques to set a password in PDF by Creating a Security Envelope:
Step 1. Launch the application and Click on Tools then please click on the Protect sub-menu icon and you will see something like this: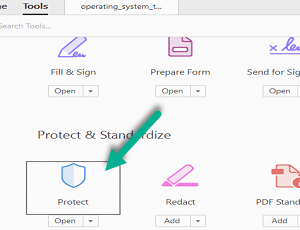
Step 2. Now click on the More Option and then select Create Security Envelope.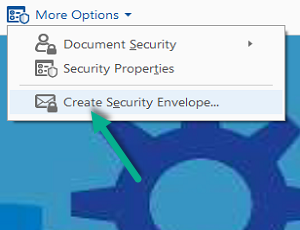
Step 3. A new window will appear along with your currently opened PDF file, and you can attach files to it by clicking on Add File to Send. After adding the files, click Next.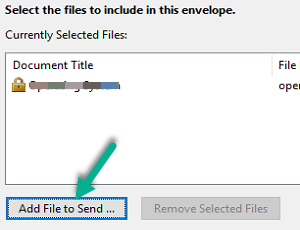
Step 4. Now you have to select a Template to continue with the procedure. Now if you’re in Windows, then you will get three Templates by default, but you can download other templates online.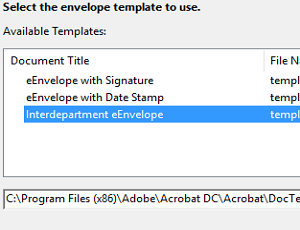
If you’re on Mac then you have to manually search for templates and browse them. Follow the location below to find the Template on Mac:
-
-
-
Open the Application Folder and right-click Adobe Acrobat.app
-
Select Show Package Contents and go to
/Applications/Adobe Acrobat DC/AdobeAcrobat.app/Contents/Resources/en.lproj/DocTemplates -
Copy the template to another location so that you can browse it.
-
-
Step 5. Now choose how you want to send the envelope. The best option is to select Send the Envelope Later. Click on Next.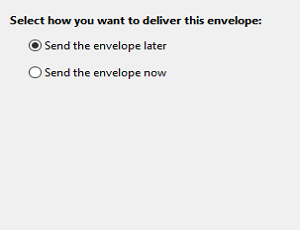
Step 6. In this new window, you have to select a Security Policy. Check on Show All Policies box, and then select Encrypt With Password. Click Next.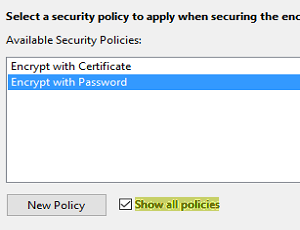
Step 7. In the next window, fill your Identity and click Next.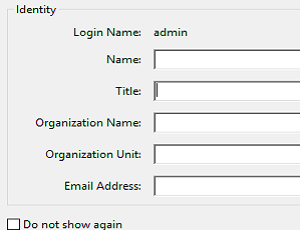
Step 8. Finally, you will get a full summary of the Template, click Finish to bring the password window and set a password.
Do not forget to Save the file after setting the password.
Want to Remove Password Settings On The PDF File?
From the above sections, we came to know about the complete process to set a PDF password. But what if the user wants to unlock secured PDF document. Then, in such cases, the best solution is to use a expert-suggested automated utility like PDF Password Protection Removal Software. It’s because with Adobe Acrobat Pro users can remove security but they must know the permission password to remove restrictions. Therefore, it is suggested to this reliable program unlocking security settings on PDF documents. Both a permission password and a known user password can be easily removed by the tool.
For Windows
For Mac OS
-
-
- Download and run the software on Windows OS
- Click on the Browse button and add a PDF document
- View the restrictions & choose the destination location
- Hit the Unlock button (If PDF has a user-level password then enter)
- Finally, Once it’s completed, completion prompt will be displayed.
-
Conclusion
Securing a PDF file has become a necessity today, not only for security but also for the protection of the file. But Here in this article you can find ways to set password in PDF file. It doesn’t matter if you want to protect a single file or multiple numbers of files, you will find this article equally beneficial.

