How to Import PST to Office 365 Skip Duplicates – Everything You Need to Know


Overview: Duplicating data in Outlook can be frustrating and can result in crucial data deletion. However, some modern techniques can easily solve this problem. Go through this guide to learn and then import PST to Office 365 without duplicates.
5 Simple Steps to Import PST to Office 365 Skip Duplicates
- Step 1. Download, Install, and Run Software.
- Step 2. Choose Outlook & Office 365 Platform.
- Step 3. Enable Desired Categories & Set Filter.
- Step 4. Log in with Valid Admin Credentials.
- Step 5. Set Source Folder Location to Add PST.
If you are a Microsoft Outlook user, you are likely to encounter duplicates. And, these duplicates act as road bumps when you want an error-free process while importing the PST files to Exchange Online. However, don’t worry, there is a convenient way available to import PST to Office 365 skip duplicates.
As a matter of fact, in this article, we are going to elaborate on the ultimate way to carry out the task.
Before moving forward with the import method, let’s first, understand the reason behind the duplication of Outlook files.
Why Do Your Files Get Duplicated in Outlook?
It’s not good to have duplicate messages, contacts, tasks, reminders, events, etc. It creates confusion, and having these can waste a lot of your valuable time while reading & sending an email.
Duplicates take up extra space in your mailbox and increase its size. But, the question is where the redundant files are being created. Let’s find out!
There are many scenarios where messages get duplicated in Outlook. Such as incorrect settings, technical failures, or user errors. Some common reasons include:
- When you try to attempt repeated synchronizations, it can lead to creating duplicates.
- If you have incorrectly configured Outlook then different rules that work with incoming or outgoing emails can copy the same to multiple folders.
- Duplicates are created due to server synchronization failures.
- If you have enabled ‘Leave messages on the server then it will download again the messages that are already received. (Applied for POP3 mailboxes)
- While restoring mail from backups, the copies of messages are duplicated with the existing ones.
- When you run multiple copies of Outlook on the same system at the same time then it’s likely to create a duplicate of the same.
- Another situation would be working with a single mailbox on more than one device. It may lead to creating duplicate messages when receiving, sending, or synchronizing.
So, the above situations you have to look out for if you don’t want duplicates.
Anyway, let’s discuss the ways you can use to import PST to Office 365 without duplicate files.
Also Read: How to Upload PST to Office 365 Using 4 Different Approaches
There are two ways, that we are going to discuss in this guide, one is manual and another is by using the automated software solution.
Step 1. Import PST into Outlook Skip Duplicates
Below are steps to import PST into Outlook:
- Launch MS Outlook >> Click on File
- Next tap on Open & Export option >> choose Import/Export
- Now, in the next window, select the Import from another program or file option and hit Next.
- After that, click on the Outlook Data File (.pst) option >> click the Next button.
- Now, click on Browse and find the location of the PST file >> choose the option Do not import duplicates >> Finish.
Caution: The “Do not import duplicates” option is used to avoid all the redundant files in the PST that are imported into Outlook.
[Important Note: You must follow Step 1 if you have an orphan PST file that you want to import without duplicates.]
After doing step 1 you will see the duplicate free PST file in Outlook and now the second step is export so that you will further import it to Office 365.
Also Read: Migrate Outlook Emails to Office 365 Mailbox: A Stepwise Guide
Step 2. Export the Duplicate Free PST File
- Open Outlook >> Tap File present on the top-left of your screen.
- Then, click on the Open & Export option >> tap on the Import/Export option.
- In the next dialog box, click on Export to a file >> press Next.
- After that, select the folder(s) to export from and hit Next.
- Now, click on Browse and select the location where you want to save your exported PST file >> click Next.
Thus, after completing step 2, you will have a redundant free PST file that further needs to be imported to Office 365.
Now, it’s time to use the tried and tested tool.
Reliable Way to Import PST to Office 365 Without Duplicates
You can use the manual method (import/export wizard) to have a duplicate free PST file and then use the export-recommended Office 365 Import Tool to upload that PST file to Office 365.
Let’s discuss them thoroughly.
If you have a PST file that is located in some other location in your system that is not imported into Outlook, then you have to first import it to MS Outlook. And if you want to move an already configured PST inside Outlook to Office 365 then you don’t have to import them just directly Export PST.
Use Reliable Software to Import PST to Office 365 Without Duplicating
Here are the five simple steps with screenshots for your convenience.
Step 1. Choose Outlook as your source platform and Office 365 as the target platform.

Step 2. On the same interface, enable the categories you need to import to Office 365 within the Workload Selection.
Step 3. Employ the Date-Range Filter to selectively import mailbox data based on specific dates. Afterward, proceed by clicking “Next.”

Step 4. You’ll now be directed to the Source screen. Select the folder path where the Outlook PST files are stored and organize them in folders named after the corresponding O365 email IDs, as follows:
Create a root folder, such as E:/PST/user1@domainName.com/ (place all user1’s PST files here).
- E:/PST/user2@domainName.com/ (place all user2’s PST files here).
- E:/PST/user3@domainName.com/ (place all user3’s PST files here).
- Continue this pattern…
Then, select the folder “E:/PST/” as the Import Folder Path within our tool.
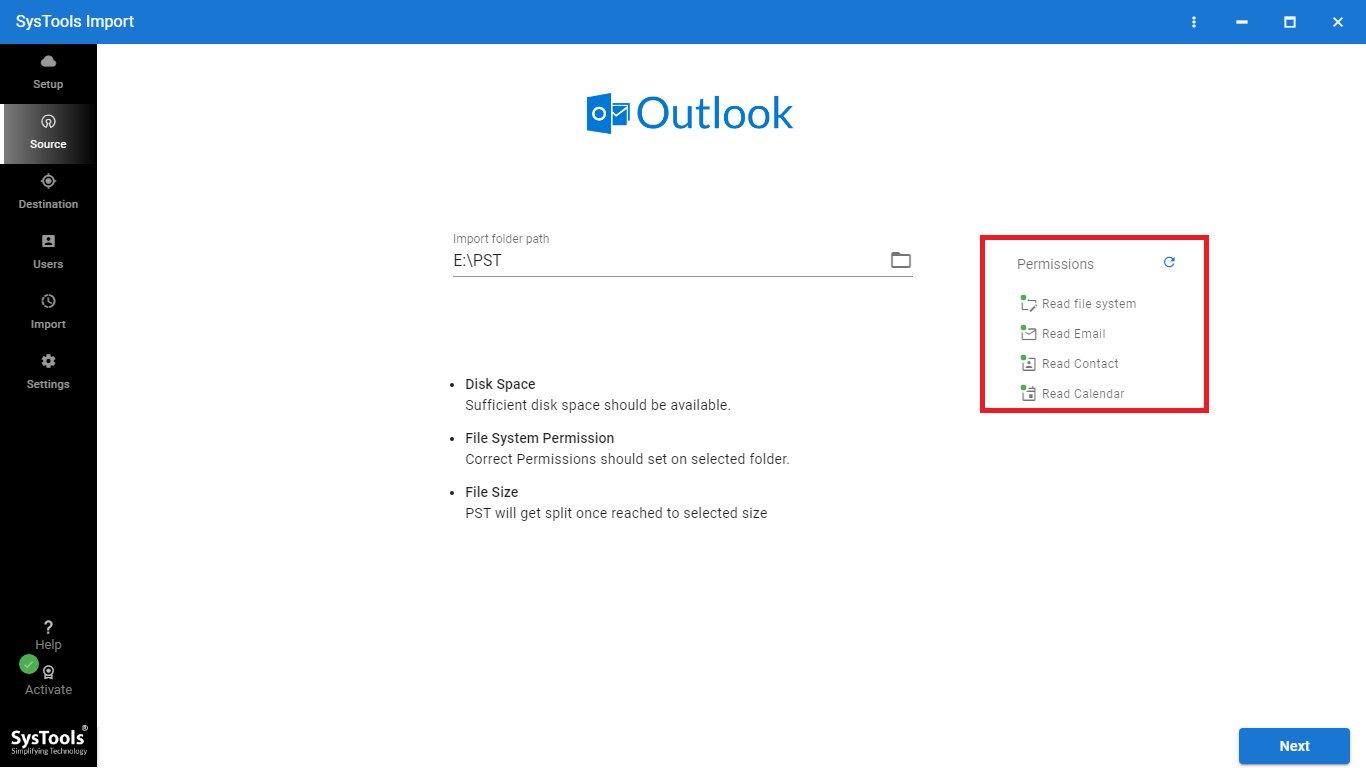
Step 5. Click on “Validate” to ensure the required permissions have been granted to the files. Once validation is successful, permissions will be granted to the source platform. Proceed by clicking “Next.”

Step 6. Input the Office 365 admin email account and the application ID for the destination. Click “Validate” to confirm the credentials. After successful validation, permissions will be granted to the admin account. Click “Next.”
Step 7. On the Users screen, you have multiple options for adding users from the source account that require processing:
- Automatically fetch users from the Source.
- Import users via CSV.
- Download a template for creating a CSV file.
Select the method that suits your needs.
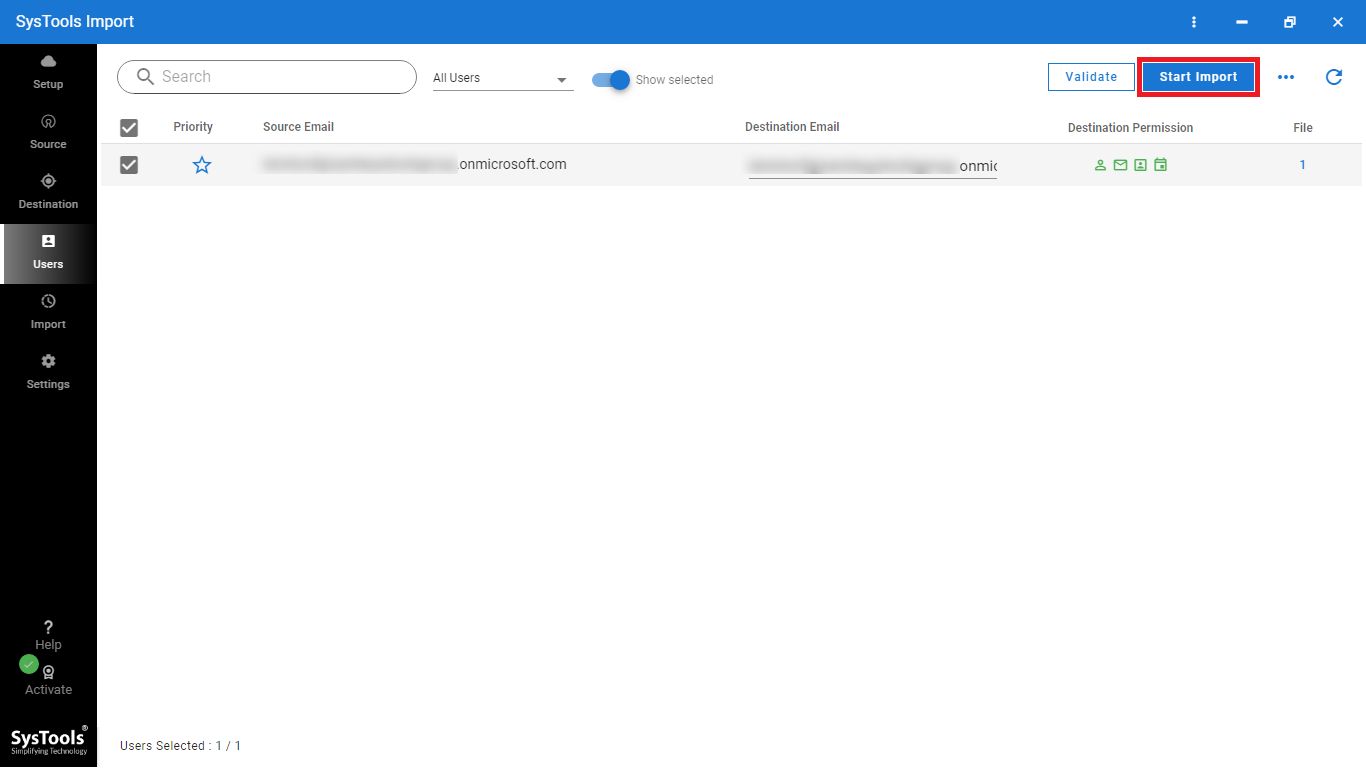
Step 8. The list of source users is displayed on the screen. You can search for a specific mailbox and select the user for data import. Use the “Show Selected” toggle bar to display only the selected users, simplifying selective data import.
Step 9. Now, you need to add destination user accounts. You have two options for this:
- Utilize the User List Template, which provides a sample CSV file for manually adding source users.
- Import users through CSV.
Step 10. Click “Validate” to authorize the selected user source and destination accounts. Once users are validated, click the “OK” button.
Step 11. Users can set priorities for the import task by selecting accounts based on priority, as shown in the image.
Step 12. Finally, click the “Start Import” button to initiate the import.
Conclusion
Many Microsoft Outlook users face data redundancy issues while importing PST to Office 365. Hence, this write-up discussed the possible reasons for duplicates and how to import PST to Office 365 without duplicates using an ultimate solution.